Installing iPod 4th Generation or Photo Rear Panel
September 26, 2009Installing iPod 4th Generation or Photo Rear Panel
The shiny rear half or your iPod case.
Tools used in this guide : Phillips #00 Screwdriver , iPod Opening Tools
Parts relevant to this guide : iPod 4G 20 GB Rear Panel , iPod 4G 40 GB Rear Panel
Step 1 — Rear Panel
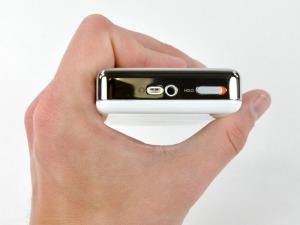
Before opening your iPod, ensure that the hold switch is in the locked position. The orange bar should be visible, indicating hold is active.
Step 2
Opening the iPod can be challenging. Don’t get discouraged if it takes you a few tries before the iPod is opened.
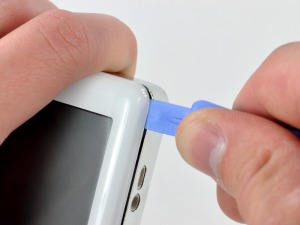
Insert a large iPod opening tool into the seam between the plastic front and metal rear panel of the iPod, near the headphone jack. The tool’s edge should point towards the metal rear panel to prevent any accidental scratching of the plastic front.
Run the tool along the top seam toward the upper left corner of the iPod. Press the tool into the corner, creating a small gap on the side of the case.
Step 3
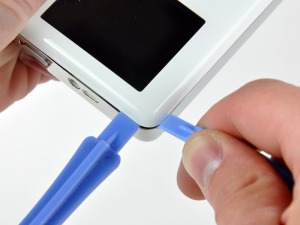
Push the large iPod opening tool into the upper left corner of the iPod, creating a small gap along the side seam.
Step 4
There are five retaining tabs on each side of the iPod.
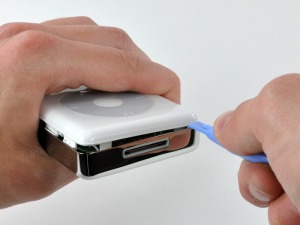
With the large iPod opening tool still inserted in the top seam, press a small iPod opening tool into the gap you just created.
Run the iPod opening tool down the side seam, releasing all five tabs.
It may be necessary to wiggle the tool while working your way down the seam to free all the
Step 5
Run the iPod opening tool around the lower left corner of the iPod and along the bottom seam to free the two retaining clips near the dock connector.
Step 6
Run the iPod opening tool around the lower right corner and slide it down the right side seam to free the five tabs holding the iPod together. You may be able to free the tabs by gently wiggling the front panel of the iPod.
Step 7
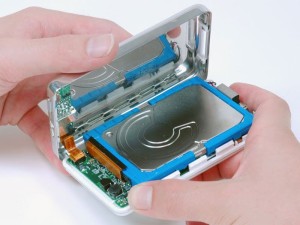
The iPod case is now open, but don’t separate the two halves just yet. There is still an orange ribbon cable connecting the headphone jack to the logic board.
Open the case like a book with the dock connector edge at the top, and lay the rear panel next to the front half of the iPod.
Step 8
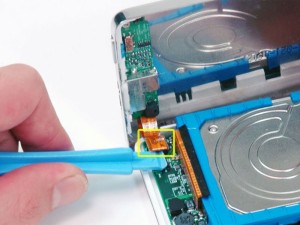
Use a plastic tool or your fingernails to carefully disconnect the orange headphone jack cable. Be sure to pull straight up on the connector, not the cable itself.
Step 9 — Rear Panel
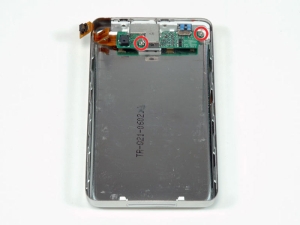
Remove the 3 silver Philips screws securing the headphone jack to the rear panel.
Step 10
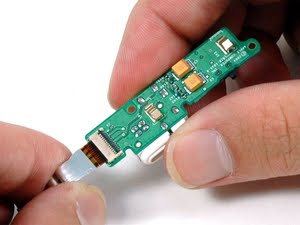
Lift the headphone jack assembly out of the iPod.
Rear panel remains.
Installing iPod 4th Generation or Photo Logic Board
September 26, 2009
Installing iPod 4th Generation or Photo Display
Replace a cracked or faulty display.
Tools used in this guide : Spudger , T6 Torx Screwdriver , iPod Opening Tools
Parts relevant to this guide : iPod 4G Display
Step 1 — Rear Panel
Before opening your iPod, ensure that the hold switch is in the locked position. The orange bar should be visible, indicating hold is active.
Step 2
Opening the iPod can be challenging. Don’t get discouraged if it takes you a few tries before the iPod is opened.
Insert a large iPod opening tool into the seam between the plastic front and metal rear panel of the iPod, near the headphone jack. The tool’s edge should point towards the metal rear panel to prevent any accidental scratching of the plastic front.
Run the tool along the top seam toward the upper left corner of the iPod. Press the tool into the corner, creating a small gap on the side of the case.
Step 3
Push the large iPod opening tool into the upper left corner of the iPod, creating a small gap along the side seam.
Step 4
There are five retaining tabs on each side of the iPod.
With the large iPod opening tool still inserted in the top seam, press a small iPod opening tool into the gap you just created.
Run the iPod opening tool down the side seam, releasing all five tabs.
It may be necessary to wiggle the tool while working your way down the seam to free all the
Step 5
Run the iPod opening tool around the lower left corner of the iPod and along the bottom seam to free the two retaining clips near the dock connector.
Step 6
Run the iPod opening tool around the lower right corner and slide it down the right side seam to free the five tabs holding the iPod together. You may be able to free the tabs by gently wiggling the front panel of the iPod.
Step 7
The iPod case is now open, but don’t separate the two halves just yet. There is still an orange ribbon cable connecting the headphone jack to the logic board.
Open the case like a book with the dock connector edge at the top, and lay the rear panel next to the front half of the iPod.
Step 8
Use a plastic tool or your fingernails to carefully disconnect the orange headphone jack cable. Be sure to pull straight up on the connector, not the cable itself.
Step 9 — Hard Drive
Grasp the hard drive with one hand and carefully disconnect the orange ribbon cable from the hard drive using your other hand.
If the cable doesn’t come free easily, it may be helpful to gently wiggle the cable from side to side.
Step 10 — Hard Drive Cable
Peel up the black adhesive strip covering the hard drive ribbon cable.
Step 11
Use the tip of your finger or a spudger to carefully flip up the black connector securing the hard drive cable to the logic board.
Step 12
Pull the orange hard drive cable directly out of its connector.
Installing iPod 4th Generation or Photo Headphone Jack Bracket
September 26, 2009
Installing iPod 4th Generation or Photo Headphone Jack Bracket
The plastic bracket for the headphone jack.
Tools used in this guide : Phillips #00 Screwdriver , T6 Torx Screwdriver , iPod Opening Tools
Parts relevant to this guide : iPod 4G 20 GB Headphone Jack Bracket , iPod 4G 40 GB Headphone Jack Bracket
Step 1 — Rear Panel
Before opening your iPod, ensure that the hold switch is in the locked position. The orange bar should be visible, indicating hold is active.
Step 2
Opening the iPod can be challenging. Don’t get discouraged if it takes you a few tries before the iPod is opened.
Insert a large iPod opening tool into the seam between the plastic front and metal rear panel of the iPod, near the headphone jack. The tool’s edge should point towards the metal rear panel to prevent any accidental scratching of the plastic front.
Run the tool along the top seam toward the upper left corner of the iPod. Press the tool into the corner, creating a small gap on the side of the case.
Step 3
Push the large iPod opening tool into the upper left corner of the iPod, creating a small gap along the side seam.
Step 4
There are five retaining tabs on each side of the iPod.
With the large iPod opening tool still inserted in the top seam, press a small iPod opening tool into the gap you just created.
Run the iPod opening tool down the side seam, releasing all five tabs.
It may be necessary to wiggle the tool while working your way down the seam to free all the
Step 5
Run the iPod opening tool around the lower left corner of the iPod and along the bottom seam to free the two retaining clips near the dock connector.
Step 6
Run the iPod opening tool around the lower right corner and slide it down the right side seam to free the five tabs holding the iPod together. You may be able to free the tabs by gently wiggling the front panel of the iPod.
Step 7
The iPod case is now open, but don’t separate the two halves just yet. There is still an orange ribbon cable connecting the headphone jack to the logic board.
Open the case like a book with the dock connector edge at the top, and lay the rear panel next to the front half of the iPod.
Step 8
Use a plastic tool or your fingernails to carefully disconnect the orange headphone jack cable. Be sure to pull straight up on the connector, not the cable itself.
Step 9 — Headphone Jack Bracket
Remove the 2 silver T6 Torx screws from the headphone jack.
Step 10
Remove the 3 silver Philips screws securing the headphone jack to the rear panel.
Step 11
Grasp the white headphone jack bracket and lift it out of the iPod.
Installing iPod 4th Generation or Photo Headphone Jack
September 26, 2009
Installing iPod 4th Generation or Photo Headphone Jack
No audio? Replace the headphone jack!
Tools used in this guide : T6 Torx Screwdriver , iPod Opening Tools
Parts relevant to this guide : iPod 4G 20 GB Headphone Jack , iPod 4G 40 GB Headphone Jack
Step 1 — Rear Panel
Before opening your iPod, ensure that the hold switch is in the locked position. The orange bar should be visible, indicating hold is active.
Step 2
Opening the iPod can be challenging. Don’t get discouraged if it takes you a few tries before the iPod is opened.
Insert a large iPod opening tool into the seam between the plastic front and metal rear panel of the iPod, near the headphone jack. The tool’s edge should point towards the metal rear panel to prevent any accidental scratching of the plastic front.
Run the tool along the top seam toward the upper left corner of the iPod. Press the tool into the corner, creating a small gap on the side of the case.
Step 3
Push the large iPod opening tool into the upper left corner of the iPod, creating a small gap along the side seam.
Step 4
There are five retaining tabs on each side of the iPod.
With the large iPod opening tool still inserted in the top seam, press a small iPod opening tool into the gap you just created.
Run the iPod opening tool down the side seam, releasing all five tabs.
It may be necessary to wiggle the tool while working your way down the seam to free all the
Step 5
Run the iPod opening tool around the lower left corner of the iPod and along the bottom seam to free the two retaining clips near the dock connector.
Step 6
Run the iPod opening tool around the lower right corner and slide it down the right side seam to free the five tabs holding the iPod together. You may be able to free the tabs by gently wiggling the front panel of the iPod.
Step 7
The iPod case is now open, but don’t separate the two halves just yet. There is still an orange ribbon cable connecting the headphone jack to the logic board.
Open the case like a book with the dock connector edge at the top, and lay the rear panel next to the front half of the iPod.
Step 8
Use a plastic tool or your fingernails to carefully disconnect the orange headphone jack cable. Be sure to pull straight up on the connector, not the cable itself.
Step 9 — Headphone Jack
Remove the 2 silver T6 Torx screws from the headphone jack.
Step 10
Grasp the headphone jack board and lift it out of the iPod.
Step 11
Turn the headphone jack board over.
Use the tip of your finger or a spudger to carefully flip up the black connector holding the headphone jack cable connector in place.
Step 12
Pull the orange headphone jack cable directly out of its connector.
Installing iPod 4th Generation or Photo Hard Drive Cable
September 26, 2009
Installing iPod 4th Generation or Photo Hard Drive Cable
Connects the hard drive to the logic board.
Tools used in this guide : iPod Opening Tools
Parts relevant to this guide : iPod 4G Hard Drive Cable
Step 1 — Rear Panel
Before opening your iPod, ensure that the hold switch is in the locked position. The orange bar should be visible, indicating hold is active.
Step 2
Opening the iPod can be challenging. Don’t get discouraged if it takes you a few tries before the iPod is opened.
Insert a large iPod opening tool into the seam between the plastic front and metal rear panel of the iPod, near the headphone jack. The tool’s edge should point towards the metal rear panel to prevent any accidental scratching of the plastic front.
Run the tool along the top seam toward the upper left corner of the iPod. Press the tool into the corner, creating a small gap on the side of the case.
Step 3
Push the large iPod opening tool into the upper left corner of the iPod, creating a small gap along the side seam.
Step 4
There are five retaining tabs on each side of the iPod.
With the large iPod opening tool still inserted in the top seam, press a small iPod opening tool into the gap you just created.
Run the iPod opening tool down the side seam, releasing all five tabs.
It may be necessary to wiggle the tool while working your way down the seam to free all the
Step 5
Run the iPod opening tool around the lower left corner of the iPod and along the bottom seam to free the two retaining clips near the dock connector.
Step 6
Run the iPod opening tool around the lower right corner and slide it down the right side seam to free the five tabs holding the iPod together. You may be able to free the tabs by gently wiggling the front panel of the iPod.
Step 7
The iPod case is now open, but don’t separate the two halves just yet. There is still an orange ribbon cable connecting the headphone jack to the logic board.
Open the case like a book with the dock connector edge at the top, and lay the rear panel next to the front half of the iPod.
Step 8
Use a plastic tool or your fingernails to carefully disconnect the orange headphone jack cable. Be sure to pull straight up on the connector, not the cable itself.
Step 9 — Hard Drive
Grasp the hard drive with one hand and carefully disconnect the orange ribbon cable from the hard drive using your other hand.
If the cable doesn’t come free easily, it may be helpful to gently wiggle the cable from side to side.
Step 10 — Hard Drive Cable
Peel up the black adhesive strip covering the hard drive ribbon cable.
Step 11
Use the tip of your finger or a spudger to carefully flip up the black connector securing the hard drive cable to the logic board.
Step 12
Pull the orange hard drive cable directly out of its connector.
Installing iPod 4th Generation or Photo Hard Drive
September 26, 2009
Installing iPod 4th Generation or Photo Hard Drive
Upgrade your storage with a new hard drive.
Tools used in this guide : iPod Opening Tools
Parts relevant to this guide : iPod 20 GB Hard Drive , iPod 40 GB Hard Drive
Step 1 — Rear Panel
Before opening your iPod, ensure that the hold switch is in the locked position. The orange bar should be visible, indicating hold is active.
Step 2
Opening the iPod can be challenging. Don’t get discouraged if it takes you a few tries before the iPod is opened.
Insert a large iPod opening tool into the seam between the plastic front and metal rear panel of the iPod, near the headphone jack. The tool’s edge should point towards the metal rear panel to prevent any accidental scratching of the plastic front.
Run the tool along the top seam toward the upper left corner of the iPod. Press the tool into the corner, creating a small gap on the side of the case.
Step 3
Push the large iPod opening tool into the upper left corner of the iPod, creating a small gap along the side seam.
Step 4
There are five retaining tabs on each side of the iPod.
With the large iPod opening tool still inserted in the top seam, press a small iPod opening tool into the gap you just created.
Run the iPod opening tool down the side seam, releasing all five tabs.
It may be necessary to wiggle the tool while working your way down the seam to free all the
Step 5
Run the iPod opening tool around the lower left corner of the iPod and along the bottom seam to free the two retaining clips near the dock connector.
Step 6
Run the iPod opening tool around the lower right corner and slide it down the right side seam to free the five tabs holding the iPod together. You may be able to free the tabs by gently wiggling the front panel of the iPod.
Step 7
The iPod case is now open, but don’t separate the two halves just yet. There is still an orange ribbon cable connecting the headphone jack to the logic board.
Open the case like a book with the dock connector edge at the top, and lay the rear panel next to the front half of the iPod.
Step 8
Use a plastic tool or your fingernails to carefully disconnect the orange headphone jack cable. Be sure to pull straight up on the connector, not the cable itself.
Step 9 — Hard Drive
Grasp the hard drive with one hand and carefully disconnect the orange ribbon cable from the hard drive using your other hand.
If the cable doesn’t come free easily, it may be helpful to gently wiggle the cable from side to side.
Installing iPod 4th Generation or Photo Front Panel
September 26, 2009
Installing iPod 4th Generation or Photo Front Panel
The plastic front half of your iPod case.
Tools used in this guide : Spudger , T6 Torx Screwdriver , iPod Opening Tools
Parts relevant to this guide : iPod 4G Front Panel
Step 1 — Rear Panel
Before opening your iPod, ensure that the hold switch is in the locked position. The orange bar should be visible, indicating hold is active.
Step 2
Opening the iPod can be challenging. Don’t get discouraged if it takes you a few tries before the iPod is opened.
Insert a large iPod opening tool into the seam between the plastic front and metal rear panel of the iPod, near the headphone jack. The tool’s edge should point towards the metal rear panel to prevent any accidental scratching of the plastic front.
Run the tool along the top seam toward the upper left corner of the iPod. Press the tool into the corner, creating a small gap on the side of the case.
Step 3
Push the large iPod opening tool into the upper left corner of the iPod, creating a small gap along the side seam.
Step 4
There are five retaining tabs on each side of the iPod.
With the large iPod opening tool still inserted in the top seam, press a small iPod opening tool into the gap you just created.
Run the iPod opening tool down the side seam, releasing all five tabs.
It may be necessary to wiggle the tool while working your way down the seam to free all the
Step 5
Run the iPod opening tool around the lower left corner of the iPod and along the bottom seam to free the two retaining clips near the dock connector.
Step 6
Run the iPod opening tool around the lower right corner and slide it down the right side seam to free the five tabs holding the iPod together. You may be able to free the tabs by gently wiggling the front panel of the iPod.
Step 7
The iPod case is now open, but don’t separate the two halves just yet. There is still an orange ribbon cable connecting the headphone jack to the logic board.
Open the case like a book with the dock connector edge at the top, and lay the rear panel next to the front half of the iPod.
Step 8
Use a plastic tool or your fingernails to carefully disconnect the orange headphone jack cable. Be sure to pull straight up on the connector, not the cable itself.
Step 9 — Hard Drive
Grasp the hard drive with one hand and carefully disconnect the orange ribbon cable from the hard drive using your other hand.
If the cable doesn’t come free easily, it may be helpful to gently wiggle the cable from side to side.
Step 10 — Hard Drive Cable
Peel up the black adhesive strip covering the hard drive ribbon cable.
Step 11
Use the tip of your finger or a spudger to carefully flip up the black connector securing the hard drive cable to the logic board.
Step 12
Pull the orange hard drive cable directly out of its connector.
Step 13 — Logic Board
Carefully disconnect the white battery connector from the logic board. Be sure to pull only on the connector itself and not on the cables.
Step 14
Use a spudger to flip up the black retaining bars securing the display and click wheel connectors to the logic board.
If you have an iPod Photo, the display connector (to the right of the picture) is located more centrally on the logic board.
Step 15
Remove the 6 black T6 Torx screws securing the logic board to the front panel.
If you have an iPod Photo, there will only be 5 screws, as there is no screw in the top right corner of the iPod.
Step 16
Slide the orange click wheel ribbon cable out of its connector.
Step 17
Carefully lift up the large end of the logic board and disconnect the display connector.
Lift the logic board out of the iPod.
Step 18 — Display
Lift the display panel out of the iPod. There may be some mild adhesive connecting the display to the front panel.
Step 19 — Front Panel
Use a spudger to pry the battery off the front panel.
Lift the battery up and out of the iPod.
Step 20
Front panel remains.
Installing iPod 4th Generation or Photo Display
September 20, 2009
Installing iPod 4th Generation or Photo Display
Replace a cracked or faulty display.
Tools used in this guide : Spudger , T6 Torx Screwdriver , iPod Opening Tools
Parts relevant to this guide : iPod 4G Display
Step 1 — Rear Panel
Before opening your iPod, ensure that the hold switch is in the locked position. The orange bar should be visible, indicating hold is active.
Step 2
Opening the iPod can be challenging. Don’t get discouraged if it takes you a few tries before the iPod is opened.
Insert a large iPod opening tool into the seam between the plastic front and metal rear panel of the iPod, near the headphone jack. The tool’s edge should point towards the metal rear panel to prevent any accidental scratching of the plastic front.
Run the tool along the top seam toward the upper left corner of the iPod. Press the tool into the corner, creating a small gap on the side of the case.
Step 3
Push the large iPod opening tool into the upper left corner of the iPod, creating a small gap along the side seam.
Step 4
There are five retaining tabs on each side of the iPod.
With the large iPod opening tool still inserted in the top seam, press a small iPod opening tool into the gap you just created.
Run the iPod opening tool down the side seam, releasing all five tabs.
It may be necessary to wiggle the tool while working your way down the seam to free all the
Step 5
Run the iPod opening tool around the lower left corner of the iPod and along the bottom seam to free the two retaining clips near the dock connector.
Step 6
Run the iPod opening tool around the lower right corner and slide it down the right side seam to free the five tabs holding the iPod together. You may be able to free the tabs by gently wiggling the front panel of the iPod.
Step 7
The iPod case is now open, but don’t separate the two halves just yet. There is still an orange ribbon cable connecting the headphone jack to the logic board.
Open the case like a book with the dock connector edge at the top, and lay the rear panel next to the front half of the iPod.
Step 8
Use a plastic tool or your fingernails to carefully disconnect the orange headphone jack cable. Be sure to pull straight up on the connector, not the cable itself.
Step 9 — Hard Drive
Grasp the hard drive with one hand and carefully disconnect the orange ribbon cable from the hard drive using your other hand.
If the cable doesn’t come free easily, it may be helpful to gently wiggle the cable from side to side.
Step 10 — Hard Drive Cable
Peel up the black adhesive strip covering the hard drive ribbon cable.
Step 11
Use the tip of your finger or a spudger to carefully flip up the black connector securing the hard drive cable to the logic board.
Step 12
Pull the orange hard drive cable directly out of its connector.
Step 13 — Logic Board
Carefully disconnect the white battery connector from the logic board. Be sure to pull only on the connector itself and not on the cables.
Step 14
Use a spudger to flip up the black retaining bars securing the display and click wheel connectors to the logic board.
If you have an iPod Photo, the display connector (to the right of the picture) is located more centrally on the logic board.
Step 15
Remove the 6 black T6 Torx screws securing the logic board to the front panel.
If you have an iPod Photo, there will only be 5 screws, as there is no screw in the top right corner of the iPod.
Step 16
Slide the orange click wheel ribbon cable out of its connector.
Step 17
Carefully lift up the large end of the logic board and disconnect the display connector.
Lift the logic board out of the iPod.
Step 18 — Display
Lift the display panel out of the iPod. There may be some mild adhesive connecting the display to the front panel.
Installing iPod 4th Generation or Photo Battery
September 20, 2009Installing iPod 4th Generation or Photo Battery
Battery not lasting long? Swap it out.
Tools used in this guide : Spudger ,T6 Torx Screwdriver ,iPod Opening Tools
Parts relevant to this guide : iPod 4G/Photo Replacement Battery
Step 1 — Rear Panel
Before opening your iPod, ensure that the hold switch is in the locked position. The orange bar should be visible, indicating hold is active.
Step 2
Opening the iPod can be challenging. Don’t get discouraged if it takes you a few tries before the iPod is opened.
Insert a large iPod opening tool into the seam between the plastic front and metal rear panel of the iPod, near the headphone jack. The tool’s edge should point towards the metal rear panel to prevent any accidental scratching of the plastic front.
Run the tool along the top seam toward the upper left corner of the iPod. Press the tool into the corner, creating a small gap on the side of the case.
Step 3
Push the large iPod opening tool into the upper left corner of the iPod, creating a small gap along the side seam.
Step 4
There are five retaining tabs on each side of the iPod.
With the large iPod opening tool still inserted in the top seam, press a small iPod opening tool into the gap you just created.
Run the iPod opening tool down the side seam, releasing all five tabs.
It may be necessary to wiggle the tool while working your way down the seam to free all the
Step 5
Run the iPod opening tool around the lower left corner of the iPod and along the bottom seam to free the two retaining clips near the dock connector.
Step 6
Run the iPod opening tool around the lower right corner and slide it down the right side seam to free the five tabs holding the iPod together. You may be able to free the tabs by gently wiggling the front panel of the iPod.
Step 7
The iPod case is now open, but don’t separate the two halves just yet. There is still an orange ribbon cable connecting the headphone jack to the logic board.
Open the case like a book with the dock connector edge at the top, and lay the rear panel next to the front half of the iPod.
Step 8
Use a plastic tool or your fingernails to carefully disconnect the orange headphone jack cable. Be sure to pull straight up on the connector, not the cable itself.
Step 9 — Battery
Carefully disconnect the white battery connector from the logic board. Be sure to pull only on the connector itself and not on the cables.
Step 10
Remove the 2 black T6 Torx screws from the left side of the logic board.
Step 11
Use one hand to lift the hard drive up in order to access the battery beneath.
Carefully thread the battery cable around the end of the logic board. Be careful not to pull up on the logic board too much while freeing the battery cable.
Step 12
Lift the battery out of the front case by pulling it up by the battery leads.
If necessary, grab the battery to pull it off the adhesive securing it to the front case.
It may be helpful to use a spudger to pry the battery up off its adhesive.
Lift the battery up and out of the front case.
iPod 4th Generation or Photo Repair
September 10, 2009Identification and Background
The fourth generation iPod was released mid-2004 with early generations utilizing a non-color screen. Early 2005 models sported a color screen designed for viewing pictures. The click wheel on fourth generation iPods integrated the scrolling feature and the control buttons into one unit. Even if you know what iPod you have, a quick trip through our iPod identification page couldn’t hurt.
The iPod Photo looks like the 4th Generation iPod, but it has a color display. Troubleshooting and replacing parts is fairly straightforward.
iPod won’t turn on
No matter what you do, you can’t get your iPod to turn on.
Hold switch on
Before delving into the guts of your iPod, check to make sure the hold switch isn’t activated. If the hold switch is on, the iPod will ignore any input on the click wheel and refuse to do anything. If your iPod’s problem isn’t so easily solved, read on.
Drained/bad battery
If your iPod won’t turn on, especially if it has not been used recently, you may simply have a drained battery. Plug your iPod into your computer or AC adapter and see if anything happens. Ideally your iPod will recognize it has been connected to a power source and charge its battery. If it will no longer charge, it must be replaced with a new battery.
Bad logic board
If your iPod does nothing when plugged into a computer, the problem most likely lies in the logic board. We carry both the 20/30 GB and 40/60 GB boards, as well as the instructions for installing them.
Bad display
It is possible that it appears nothing is happening because the display is bad. If you hold the iPod up to your ear you should be able to hear the hard drive spinning. If the iPod sounds like it is working properly but nothing is visible, it is possible the display is bad and must be replaced.
No audio or distorted audio
Your iPod turns on and appears to work, but when you plug in headphones or speakers, the audio doesn’t play properly.
Bad headphones/speakers
It’s unlikely your headphones or speakers are bad, but it’s worthwhile to eliminate these as the source of your problem at the beginning. Try your iPod with another set of headphones or speakers just to make sure that the problem is with the iPod.
Bad audio jack
The most likely cause of audio output problems on iPods is a bad audio-out jack. We sell the thin (20/30 GB) and thick (40/60 GB) headphone jacks, and we offer free guides for replacement. If this does not restore audio, the headphone jack cable (20/30 GB and 40/60 GB) may be the culprit.
Sad iPod icon on startup
The iPod displays an image of a sad iPod when turned on
Corrupted software
Sometimes, a reset and restore will fix a sad iPod. Connect your iPod to your computer and use iTunes to restore the iPod. Restoring the iPod will erase everything on it, so make sure everything on the iPod is stored elsewhere prior to restoring. Sometimes it may be necessary to restore the iPod several times before it works properly. If you are unable to restore your iPod using iTunes, you can hard reset your iPod. Photo iPods can be hard reset by booting while holding the menu and play/pause buttons. This should result in a quick dark screen followed by the standard Apple boot graphic.
Bad logic board
If restoring the iPod didn’t work, the sad iPod is likely caused by a problem with the logic board. There’s not much to troubleshoot here. Basically, the only option is to replace the logic board (20/30 GB or 40/60 GB).
Folder icon appears on startup
The iPod displays an image of a folder when turned on.
Corrupted software/data
It is possible that a simple restore may resurrect the hard drive. Restoring the iPod will erase everything on it, so make sure everything on the iPod is stored elsewhere prior to restoring. To restore, connect your iPod to a computer with iTunes installed. Upon connecting, a message may pop up, informing you that your hard drive is corrupted and/or in recovery mode. If one of these messages pops up, click the “Restore Now” button and follow the directions. If no pop up message appears, click “Restore” on the iPod summary page (click on your iPod icon on the left menu to find this page). Follow the directions to restore.
Bad hard drive or cable
One of the best methods to diagnose a failing hard drive is to listen to the drive. If you put your iPod up to your ear, you should hear a smooth-sounding whirr of the hard drive spinning. Any loud clicking or grinding sounds may mean that your iPod’s drive is failing. If you don’t hear anything, the drive is not getting power or is very damaged and can’t spin up. In this instance, replacing the hard drive cable first is a good idea. Then, if the problem persists, replace the hard drive. Browse our hard drives and check out our iPod ID page for compatible drives.
iPod doesn’t boot past Apple logo
The iPod either boots to an Apple logo and freezes or continuously reboots.
Bad logic board
This is likely the cause, and the logic board (20/30 GB or 40/60 GB) must be replaced.
